A Guide to the Basics of Metering Modes

Metering modes is something for which a large number of photographers rely solely on the camera settings. This is because people don’t have enough knowledge about it in the beginning. However, the problem is you can't go much farther with the camera settings.
This rule is quite common in most cases. Camera settings are only for beginners however when you want to enhance your photography skills, you have to learn about making minor changes to the camera settings in order to capture really appealing photos.
This guide is going to be all about metering and metering modes. Let us jump right into the details without further delay.
What is metering?
Before we go on discussing other details, talking about the basic definition will be the right decision. Metering can be defined in the simplest terms as a way of taking the light reading. You will be able to understand this term more clearly after having some idea about tone.
Talking of the tone, there are three tones in a rightly exposed image i.e. highlights, mid-tones, and shadows. Every image with proper exposure will contain all these three tones. In case you are unable to understand these three, here is a brief introduction.
Shadow in an image is generally the darkest part while the highlight is the brightest. The mid-tone lies in the middle of these two in terms of brightness. Every camera comes with a built-in tool called the light meter.
The light meter is the tool that sets the correct exposure by itself by balancing shadow, mid-tone, and highlight. You will be able to see these details once you put your eye on the viewfinder of the camera.
The process of taking a light reading
In order to decide three things, you need to choose a part in the image. The skill of the photographer lies in choosing the meter off some point in the scene. In case you fail to choose the right part, the photo will be devoid of the right exposure.
Suppose you are shooting a photo and meter off the brightest part, the photo will become too bright. Being familiar with the basics is not enough in this case. That is why we are going to discuss the major metering modes in order to help you further.

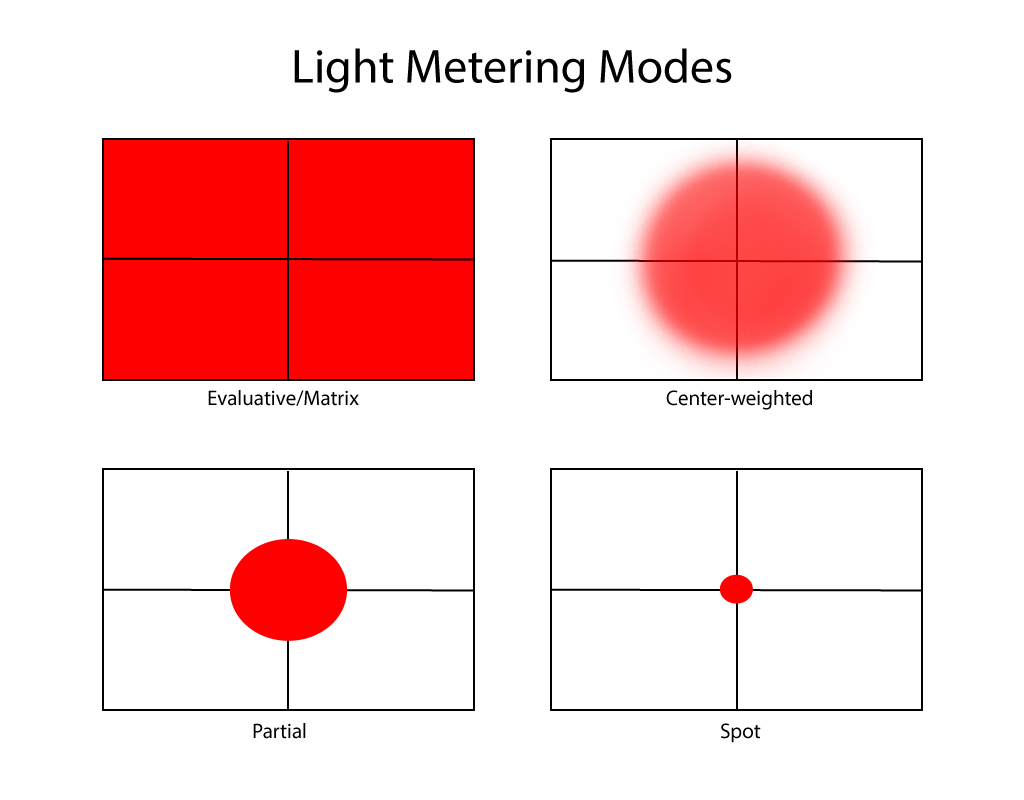
Diagram of metering modes on a camera (Source)
Metering modes available in the majority of cameras
Metering modes may help you in the best possible way to create truly astonishing photos. However there is a feature that comes by default in almost all the cameras. Irrespective of the values of the three elements of exposure, the light meter tries to get things right around 18% grey.
It works in most cases however not in some extreme cases. Suppose you are shooting a photo of a snow mountain or some landscape or object consisting of too much black colour in it, the 18% grey thing will ruin the beauty of these photos. So, you must review these images on the histogram to see if it works well for you.
There are four basic modes available for metering, in this case, let us have a look at them.
Centre-weighted mode
This mode is very important in case you are zooming into the image a bit. As the name suggests, the centre-weighted mode is used to increase the preference for the light coming from the middle of the scene.
Though it is able to read light from the overall frame and it does, it mostly focuses on the light coming to the middle of the frame.
Spot metering mode
This mode is made for the ultimate inward push of the light. It usually studies light from around 1-5% of the scene you are capturing. It is one of the most commonly used modes however beginners may find it a bit difficult to work with it.
One pro tip that you can opt for here is making the right use of the centre AF point and exposure button. Have a careful look at the scene and adjust the subject right in the middle of the frame and we are assuming that the subject has better light exposure that you can meter from.
After you have done it, you need to lock the exposure before you recompose it. Once you are finished with these all you have to do is focus and shoot. If you are shooting portrait photos, this mode of metering works the best. There is no other way to get as balanced skin tone as this one if you are involved in shooting portrait photos.
Evaluative metering mode
This metering mode is used by default in the majority of digital cameras. In this mode, the light meter takes light input from the entire scene.
Then the inbuilt software and other components in the camera make proper use of that light to compose the frame perfectly. There is not much to do from your side in this case.
Partial metering mode
The partial metering mode takes the centre-weighted metering mode further. Here, the frame is zoomed in further. Depending on the manufacturer of your camera, the light meter takes input from around 6-15% of the centre of the scene.
Several experts have the opinion that it works the best with aperture or shutter priority mode.

Photographers! Earn a $200 Sign up Bonus... |
|---|
Interested? Sign-up here(more details) |
Final words
You must have learned a lot about metering mode by now. However it is not all. There is a lot more to learn in this field once you start on with this process. Make sure you are using the metering modes with an activated aperture and shutter priority mode.
Once you master everything mentioned in this article, you will be ready to go on with the full manual mode. In that case, an exposure lock button will not be required.
Since you are equipped with every essential piece of information that you need at this stage, grab your camera and start using these features. It is the only way to acquire skills.
No matter which technique you are following in photography, you always need to keep in mind that the rules can be broken. A real photographer will never care about rules if they are hindering him from taking an astonishing photo.
About the Author
Emma Taylor is an Australian blogger and photographer, who lives in Melbourne with her two cats, where she frequents live theatre and wine bars.


