How to Remove Backgrounds from Photos Effectively

Certain backgrounds work as a fundamental need in many cases. Suppose you are working on some presentation and you have to add some image to that. But the options that you think might work here have different backgrounds.
You simply can’t include such images in the presentation as those images can ruin the entire presentation. The first requirement, in this case, would be to maintain uniformity in the backgrounds of the images.
There is no end to the list of requirements when you would prefer to have a specific background in the images. In order to ease your efforts to do it, we are going to talk about simple and easy ways to remove background from photos. So, let us get started without further delay.
We would be talking about several applications (most web-based) that would serve your purpose in the majority of cases. The abundance of applications for different tasks often leaves people confused while choosing one.
But we are sure one of these would work the best for you. There are tools that might appear too advanced for some people. But you can do the same with a simple application called Snagit. The approach remains the same in most cases but the steps required to do that make all the difference.

Remove backgrounds using Photopea
Photopea is a free browser based image manipulation and editing program, very similar to Adobe Photoshop.
Photopea is a fantastic choice if you want to remove backgrounds from your photos, especially if you shoot a product or person with a solid background.
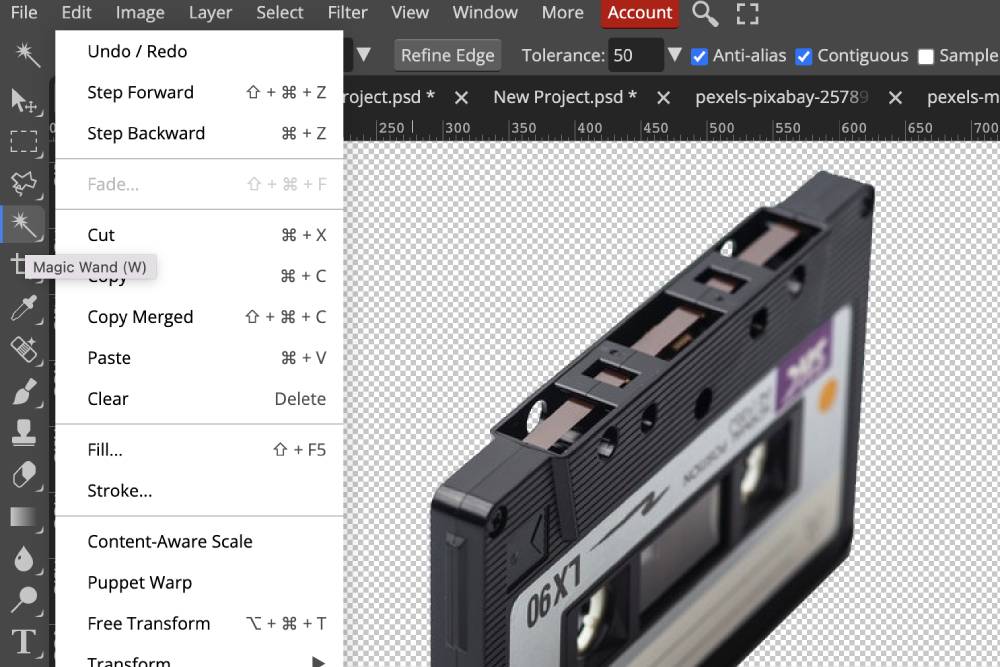
Magic Wand
The magic wand tool works for solid, as well as, gradient backgrounds. Let us see the right way to use it.
- When you have inserted the image, you have to select the Magic Wand tool from the toolbar of the Editor. You can also find this tool in the More dropdown as well.
- You will see a background fill option in it. Click on the Transparent option here.
- Now you have to select the portion of the background you have to remove. You can use the slider to adjust the portion of the background.
- Press the Delete button to remove the portion of the background you want.
Selection Tool
This is an option that lets you remove background from photos around shapes.
- Insert the desired image and go to the toolbar of Photopea Editor.
- Click on the Freehand shape option from the Tool properties.
- Now, you have to choose the transparent option from the background fill option.
- Use the click and drag function to select the shape. Remember that the shape you have selected will be preserved in the image after you remove backgrounds from photos.
- After you have clicked on the Snap to object option, you will bind the selected portion of the image.
- Those who are using Mac should press Control then click the mouse button to invert the selected portion of the image. The Windows users have to right-click using the mouse to do the same.
- You can replace the background of the image by clicking on the Delete button.
These are the ways you may use to remove background from images. If you have Microsoft PowerPoint on your PC, you can use that to remove backgrounds from photos. Let us take a look at how to do that.

Do it with Microsoft PowerPoint
There are two ways to remove backgrounds from photos using MS PowerPoint. One method works fine for solid backgrounds while the other is good for quite complicated backgrounds. Let us talk about them both one by one.
Method 1 (works best for solid backgrounds)
First, you have to launch MS PowerPoint and then click on the blank presentation to get started. Follow the steps mentioned below to do the rest.
- Insert the picture that you want to remove the background from. You can do it by clicking on the Insert option from the toolbar and then you have to select Pictures. Now you will be able to get images from your PC into it.
- Select the picture that you have inserted in the slide and a new option will appear in the toolbar named Picture format.
- In the picture and format option, you need to click on the colours option.
- From the drop-down, there is an option called set transparent colour. Click on this option.
- Now you have to move the pointer to the colour that you intend to make transparent. Just drag the point anywhere on the background and your background will be removed.
Method 2 for complex backgrounds
This method is not as straightforward as the one mentioned above but it is highly suitable for complex backgrounds.
- Insert the image and select it.
- You will see an option named Remove background in the picture format. The remove background option is available at the extreme left of the picture format menu. Click on Remove background.
- Now another list of tools will appear and you have to click on Mark areas to keep. Drag over the whole area that you have to keep. And the rest of the image would be considered as a background that you have to remove.
- You will see the subject highlighted in its usual colour and the background will be of magenta colour.
- Once you click on the option Keep changes, PowerPoint will remove the background.
Want to earn money from your hobby?Sign up free as a Stockphoto.com contributor today!
|
Do it with Snagit
Snagit works nicely if you want to have a transparent background in your images. Apart from that Snagit lets you do it for free on Mac or Windows. There are three ways you could do it with Snagit and we will take a look at all of them. Let us start with the first one.
Fill
You may use this tool for solid backgrounds. Here is how you use this tool to remove backgrounds from photos.
- After you have inserted the image into this application, go to the toolbar and click on the Fill option. In case you can’t find the Fill option in the toolbar, click on the dropdown option named More.
- Select the Transparent option here. The icon for it is a square with a checkerboard pattern in it.
- Now you have to select the area in the photos that you have to make transparent. You can select the portion of the background as per your demands.
- Press the Delete button to remove the selected background from the image
There is a tolerance slider in the Tool properties that you may use to fill the parts of the image as you desire. Consider using this slider for specific results.
Magic Wand
The magic wand tool works for solid, as well as, gradient backgrounds. Let us see the right way to use it.
- When you have inserted the image, you have to select the Magic Wand tool from the toolbar of the Editor. You can also find this tool in the More dropdown as well.
- You will see a background fill option in it. Click on the Transparent option here.
- Now you have to select the portion of the background you have to remove. You can use the slider to adjust the portion of the background.
- Press the Delete button to remove the portion of the background you want.
Selection Tool
This is an option that lets you remove background from photos around shapes.
- Insert the desired image and go to the toolbar of Snagit Editor.
- Click on the Freehand shape option from the Tool properties.
- Now, you have to choose the transparent option from the background fill option.
- Use the click and drag function to select the shape. Remember that the shape you have selected will be preserved in the image after you remove backgrounds from photos.
- After you have clicked on the Snap to object option, you will bind the selected portion of the image.
- Those who are using Mac should press Control then click the mouse button to invert the selected portion of the image. The Windows users have to right-click using the mouse to do the same.
- You can replace the background of the image by clicking on the Delete button.
These are the ways you may use to remove background from images. If you have Microsoft PowerPoint on your PC, you can use that to remove backgrounds from photos. Let us take a look at how to do that.
Photographers! Earn a $200 Sign up Bonus... |
|---|
Interested? Sign-up here(more details) |
Final words
There is no end to the number of ways you can use to remove backgrounds from photos. We tried to mention the simplest ways to get things done. It's all up to your demands and preferences when it comes to choosing one.
About the Author
Emma Taylor is an Australian blogger and photographer, who lives in Melbourne with her two cats, where she frequents live theatre and wine bars.


